Windows only: When it comes to getting deep into a Windows system and tweaking the stuff you can't get to from the Control Panel, the free tools provided by Nirsoft and Sysinternals are hard to beat. Windows System Control Center is a free, no-install app that provides a convenient front-end for running every app released by those groups. The app requires that you keep each group of utilities in the same directory, but the majority of them are portable and USB-friendly. System Control Center requires that you download the apps in question, but it also links to a few standard high-level Windows tools for all-in-one fix-it work. System Control Center is a free download for Windows systems only. Update: austin316gb points out two links to download all the Sysinternals and Nirsoft apps in short order.
Friday, October 31, 2008
System Control Center is a Dashboard for Windows Tweak Tools
Ubuntu 8.10 Released, Includes Bootable USB Maker
 Ubuntu 8.10, the "Intrepid Ibex" release of the free, open-source Linux distribution, is officially out and available for download. This release doesn't bring much huge or startlingly new to Ubuntu, but does smooth out some rough edges and improves the Wi-Fi, 3G, and portability experience. Check out our full screenshot tour of Intrepid Ibex to see what's inside, and if your ISO downloads or upgrades are going slow today, read up on upgrading using BitTorrent or grabbing updates and ISOs from a mirror server. There's also one or two new tools we didn't catch earlier this month in the final release, which we'll peek at below. Ubuntu 8.10 is a free download; it can run as a live CD or install on most Intel-based systems.
Ubuntu 8.10 includes a simple, working tool that puts a bootable Ubuntu system on a memory stick and lets you use persistent space on it to store settings and documents—in other words, keep a real Home folder there. I really wish, however, that you didn't have to download an Ubuntu ISO to make the disk, or that it could at least point you to a list of mirrors to find one on. In a perfect world, it would just create your USB disk from your current system, removing any specific hardware references and the like. As it is, though, it's a pretty handy tool for any spare thumb drives you've got.

Also new in the release candidate and final versions of 8.10 is a "System Cleaner" applet. I couldn't dirty my brand-new desktop quick enough to give a good screenshot, but the Cleaner will apparently show any unneeded and abandoned software packages hanging around your system, and will also alert you to bad or leftover lines in your /etc/fstab (drive configuration), /etc/X11/xorg.conf (display and device manager), and all the other files you want to back up before messing with. If it works as promised, it's a pretty good step toward that "for humans" slogan the distro touts.

Tell us your impressions of the final Intrepid Ibex in the comments.
AppTimer Measures Program Start-Ups to the Millisecond
 Windows only: You're nearly at wit's end with certain laggy, hard-drive-crushing apps on your system and ready to make a switch—but are they really any faster at starting up and getting going than the alternatives? AppTimer, a stand-alone utility, runs your programs for you and measures how long it takes them to get to an idle, ready state. It's a relatively simple program, but it puts out seriously detailed logs, and you can change the means by which you measure a program's ready state, how many times to run it, and how to close it. In other words, it looks like I'll be using a new tool come the next round of browser speed tests. AppTimer is a free download for Windows systems only.
Thursday, October 30, 2008
The "Breathing" Mobile Washer
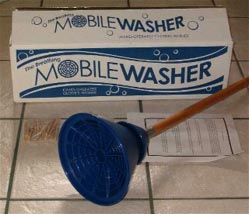
The "Breathing" Mobile Washer is a manual agitator that helps me do as good a job as a conventional washer machine, even better in my opinion. We do almost all our laundry at home in the tub, using the Breathing Mobile Washer and the previously-reviewed large spin dryer. The washer is sort of like a plunger, only made of rigid materials. The cone is articulated, so air is allowed to escape -- unlike a plunger, you don't get a build up of air pressure. Inside, near the bottom, there's a plastic grate. When you push down, water is driven through whatever is under the grate. Unlike the agitator in a conventional washer does, this washer doesn't just move the items around in the water. It literally forces water through the material. At the same time, though, it's gentle on clothing. There's lots of surface area, so there's little chance of anything tearing from potential stress. And, of course, being manual, you decide how hard to go at something. A dirty pair of jeans is always going to get a more thorough plunging than a delicate sweater or blouse. Soaking and pretreating laundry does most of the hard work. We do find it's important to still pre-treat stains, but we had to do that with our conventional washer, too.
Overall, using the mobile washer does not take too much work. I can throw the equivalent of 2-3 loads into the tub, agitate them for a minute or two to ensure everything is soaking well, then leave it for ten minutes or so, come back in, agitate it some more, leave it for another ten minutes, then give it a final agitation before loading it into the spin dryer in 2-3 batches. Since we usually use only one load of wash water and one load of rinse water for multiple loads of laundry, we're essentially doing 3-6 loads of wash with the same amount of water, detergent, and softener as we'd normally use in a single load. (Note: we use white vinegar in the rinse water instead of fabric softener).
According to the manufacturer, the Breathing Mobile Washer is actually a revamp of an old patent from the late 1800's. The old version was made of heavier metal that supposedly rusted. This one is lighter; the cone is made from plastic and the handle is wood.
-- Christine Mank

The "Breathing" Mobile Washer
$17
$35 (non-U.S.)
Available from The "Breathing" Mobile Washer
Tuesday, October 28, 2008
Start Google Chrome in Incognito Mode
 Programmer Michael T. Bee offers up a small, desktop-friendly JavaScript file that starts Google's Chrome browser in Incognito Mode for those privacy-please browsing sessions. Actually, the script, which you can paste into Notepad or another editor and save as a .js file, starts Chrome, opens a no-cookie, no-tracks-left Incognito window, then kills the first window. If your system can't launch Chrome by running
 chrome.exe in Windows' "Run" dialog, you might have to tweak the sixth line of the script a bit. Otherwise, it's a handy trick for, as the Hacks Blog puts it, "birthday shopping."
Testing out Qik alpha for my BlackBerry 8330
I got a message yesterday from the fine folks at Qik letting me know that they’ve added support for a number of BlackBerry devices. These include the Bold, the Pearl, and a couple of Curves, the 8320 and the 8330. Since I’m a proud owner of an 8330, I decided to give the service a whirl. It’s still in alpha, so I knew going in there would be some bugs. Since this seems like a neat new service, though, I thought I should give it a try. Here’s what I found.
Managing your Netflix queue from your BlackBerry
So, did all of you Mac and BlackBerry users see the news yesterday? I know they’d been talking about it for a while, but Netflix finally added streaming capabilities for Mac users. So this means I can finally re-join Netflix. Here’s another reason: SmartFlicks. It’s an application for your BlackBerry which manages your Netflix queue. Pretty neat, huh?
Monday, October 27, 2008
System Explorer All-In-One PC Monitor and Manager
 Windows only: When you want to manage your PC's processes, startup items, network connections, windows, tasks, open files, and installed software, you can do that all using the free all-in-one monitoring tools System Explorer. The long list of functionality in System Explorer's broken down into four categories: Monitoring, Autoruns, Software, and Settings (they're tabs across the top). From there you can drill down and manage running processes, files, tasks, and more. While we've seen a few souped-up task manager type apps (like TaskExplorer), System Explorer packs in even more features with a small memory footprint and USB drive-friendly portable version. Check out a few screenshots of System Explorer in action.
Under Monitoring, here's the Processes tab for straight up task manager-like functionality, with built-in hooks to ProcessLibrary.com and Google to look up what the heck a particular running file is, anyway:

Under Autoruns, here's the Startups section, where you can trim what autostarts with your PC:

Under Monitoring, hit the Performance tab to see live-updating graphs of what's eating up your RAM and processor:

System Explorer is a free download for Windows XP and Vista, portable version available. Thanks, thelord!
Frugal Tips for New Homeowners also Happen to be Green

Green as Side-Effect of Saving Money, and Vice-Versa
So I was reading The Simple Dollar, a personal finance blog, and stumbled on an article about 18 Things a New Homeowner Should Do Immediately to Save Money.
It just so happens that the very same tips that can help someone save money are also very green. In fact, out of the 18 tips, 16 are directly green, and the last 2 could be considered green indirectly. Maybe there are some you haven't done yet. See the list below.
Here is the complete list. For the details, you'll have to go check out the article at The Simple Dollar.
- Check the insulation in your attic - and install more if needed.
- Lower the temperature on your hot water heater down to 120 degrees Fahrenheit (55 degrees Celsius).
- Toss a water heater blanket over that hot water heater as well./li>
- Install ceiling fans in most rooms.
- Wrap exposed water pipes with insulation.
- Install a programmable thermostat - and learn how to use it.
- Hang a clothes rack in your laundry room (or, better yet, an outdoor clothesline).
- Check all toilets and under-sink plumbing for leaks or constant running - and check faucets, too.
- Replace your air handling filter.
- Make sure the vents in all rooms are clear of dust and obstructions.
- Mark any cracks in the basement with dated masking tape.
- Install CFL and LED light bulbs in some locations.
- Choose energy efficient appliances, even if you have to pay more up front.
- Set up your home electronics with a SmartStrip or two.
- Air-seal your home.
- Plant shade trees near your house.
- Take advantage of tax benefits for any improvements you make.
- Develop a home maintenance checklist - and run through it for the first time.
For more tips on how to go green, which can also save you some money, check out our guides.
Battle of the Thumb Drive Linux Systems
 These days, it only takes an increasingly-cheap USB thumb drive and a program like UNetbootin to create a portable Linux desktop you can run on any computer that can boot from a USB port. But check out the list of distributions UNetbootin can download and install—it's huge, and the names don't tell you much about which distro is best for on-the-go computing. Today we're detailing four no-install distributions—Damn Small Linux, Puppy Linux, Xubuntu, and Fedora—and helping you decide which might work for that spare thumb drive you've got lying around, or as just a part of your multi-gig monster stick. Read on for a four-way faceoff of bootable Linux systems.
Note: All but one of the systems tested here were created with UNetbootin, available for Windows and Linux downloads, and using the latest version available that could boot from USB. All were run on the same laptop, a 2.0 gHz Centrino Duo ThinkPad with 2GB of memory/RAM. Fedora 9 was run using its own live USB creator, as explained previously.
Damn Small Linux 4.4.6
 Ultra-small (and efficient) Linux distribution using an older version of the Linux kernel (great for real old hardware, not so hot for the newer stuff).
- Min. requirements: 486 Intel processor with 24MB RAM.
- Image size: 50MB (forever, according to project leaders).
- Boot time: 23.1 seconds.
- Features: Firefox and super-slim Dillo browser both available. Access to tons of built-in, geeky tools like SSH/FTP servers; Built-in Conky display. Right-click access to nearly anything.
- Needs improvement: Cluttered menus (necessarily so, perhaps). Hardware detection is tricky - missed, or just didn't set up, my ThinkPad's USB mouse, Intel Wi-Fi card, and integrated sound. Graphics are definitely old-school VESA, which might grate on some.
- Who would like it: Anyone with really, really old hardware, or those who feel comfortable at a command line or in networking jargon.
Puppy Linux 4.1
 This light bootable system can run from a USB stick, but if a system has more than 256MB of RAM, Puppy can move itself entirely onto a "ram disk," letting the user pull out their portable drive and keep working. Read Gina's walk-through of Puppy for details.
- Min. requirements: Pentium 166MMX with 128MB RAM.
- Image size: 94MB
- Boot time: First boot: 43.5 seconds, with pauses for interface prompts; More if choosing better XORG video driver. Boot after session saved and configuration set: 32 seconds.
- Features: Network connection wizard can get most decently savvy users online. Support for MP3s and other proprietary media (even Blu-Ray burning!) on first boot-up. Many unique tools (Puppy podcast grabber, PDF converter, custom Puppy distro maker) and good picks (GParted partition editor, password manager). Wizards offered for most hardware types not auto-detected and other tasks.
- Needs improvement: The gauntlet of first-boot questions and video options can be trying (suggested video modes not working, choices not entirely clear). Wireless config worked when manually set up, then disappeared. Like Damn Small Linux, menus can be cluttered and hard to navigate.
- Who would like it: Those looking to dedicate a thumb drive, or at least most of it, to a working, fast-moving, persistent desktop.
Xubuntu 8.04
 Basically the Ubuntu platform, optimized to run the lighter Xfce desktop manager.
- Min. Requirements: 128MB RAM for live session (192 to install); Pentium-class processor assumed.
- Image size: 544MB
- Boot time: 48.4 seconds.
- Features: Ubuntu-specific apps and tools (Add/Remove programs, Firefox modifications, settings manager, etc.). Switch-able support for GNOME and/or KDE apps. Can install in Windows without partition changes (via Wubi). Network manager offers most painless wireless connections. Native support for NTFS drive access.
- Needs improvement: No built-in persistence option. Systems near the low end of RAM requirements will feel the pinch with multiple apps open.
- Who would like it: Basically, anybody who favors an Ubuntu system, but would like a slimmed-down version run from a USB stick, with a few of its programs remixed.
Fedora 9 Live
 The Fedora Project has its own handy, Windows-friendly Live USB maker that makes adding Fedora to your USB drive—without damaging your other data—pretty simple. Read our Fedora-on-a-stick guide for more info.
- Min. requirements: 400 MHz Pentium II, 256MB RAM.
- Image size: Approx. 725MB.
- Boot time: 45.5 seconds.
- Features: Support for PowerPC hardware on even the newest Fedora releases. Customized "persistent overlay" for storing documents and data. Generally strong, updated GNOME and KDE desktops, with some new features added quickly.
- Needs improvement: Enabling NTFS drive access and proprietary media playing would've been nice defaults. Occasional hang-ups when accessing certain system features. Bleeping and chirping system sounds get old very fast.
- Who would like it: Anyone who has enough computer power, and USB space, to want a complete, up-to-date GNOME or KDE desktop running.
Our take (and yours)
After using each of the systems above to browse a few web pages, edit a Word document and check out a few music files on my Windows partition, I found myself liking Puppy Linux, on the whole, more than the others. It can work as either a fully-live system that start you clean each time, or give you a persistent disk space to store you stuff in. It's not a bad looking desktop either, and aside from a wireless quirk, I found it decently easy to use and really fast-moving.
Friday, October 24, 2008
Some Productive Ubuntu Kung Fu

Editor: Say hey to Keir Thomas, author of the new book Ubuntu Kung Fu, who stopped by to share some of his best material from the book. Thomas writes:
Here are a few of my favorite pointers to increase productivity if you're an Ubuntu user. None of the tips are specific to Ubuntu, and with a little wrangling should work on any GNOME-based Linux desktop. All are taken from my new book Ubuntu Kung Fu, which contains over 300 other tips on the topic of productivity, security, performance, image editing, the command-line, hardware, and much more.
1. Instantly Search Google for Any Word or Phrase
Have you ever been reading a document and wanted to look up something in Google? In Firefox you can just highlight the word or phrase, right-click it, and select Search Google. However, what if you’re reading, say, a PDF file? Or a man page in a terminal window?
A very simple but effective solution is Googlizer, which you can install using Synaptic. Once installed, it’s added to the Applications —-> Internet menu, so you’ll have to manually drag and drop it to a blank spot on the panel for quicker access.
How it works is simple. Highlight any text, in any application, and then click Googlizer’s icon to instantly search Google. If a Firefox window is open, a new tab will be added showing the search results. Otherwise, Firefox will be started, and the search results will be shown. Try it. It’s one of those simple things that might just change the way you work forever.
Googlizer can be personalized so that it searches the version of Google localized to your country or even a non-Google search engine. To do this, you’ll need to discover the search URL for the engine you want to use. To do so, just perform a search using either the localized version of Google (for example, http://www.google.co.uk, if you live in the UK) or a different search engine. Then look at the URL for the part where your search term appears, and highlight/copy all that comes before it.
For example, if I search for Ubuntu Kung Fu using http://www.google.co.uk, I get the following URL for the search results page:
http://www.google.co.uk/search?hl=en&q=Ubuntu+Kung+Fu&btnG=Google+Search&meta=
...so I chop the end off, from the Ubuntu+Kung+Fu part onward, and I’m left with the following, which I copy into the clipboard (highlight the text, and hit Ctrl+c):
http://www.google.co.uk/search?hl=en&q=
Once you have the information, right-click the Googlizer panel icon, and select Properties. In the Command line, add —url after googlizer, and then paste your Google URL. For example, I ended up with the following, as shown in the screenshot (note that I resized the dialog box for the purposes of the figure):
googlizer --url http://www.google.co.uk/search?hl=en&q=
You can also change the icon if you want by clicking the icon preview at the top left of the dialog box.
When finished, click the Close button, and then test the new localized search.
Here are some URLs that will make Googlizer use other search engines—-just add these addresses after the --url part of the Command line, as described earlier:
Yahoo.com: http://search.yahoo.com/search?p=
Ask.com: http://www.ask.com/web?q=
Microsoft Live: http://search.live.com/results.aspx?q=

2. Turn Your Desktop into Your /home Folder
Do you use your desktop as a dumping ground for files and pretty much ignore your actual /home folder, which is where you should store things? If so, you might be interested in this tweak, which effectively makes Ubuntu use your /home folder for the desktop, instead of the actual /home/username/Desktop folder. Anything saved to the desktop, such as files/folders dropped there, will be placed in your /home folder. Additionally, anything in your /home folder will appear on the desktop.
To try this, hit Alt+F2 and type gconf-editor. In the program window that appears, navigate to /apps/nautilus/preferences in the list on the left, and
put a check alongside desktop_is_home_dir on the right of the program window. Then log out and back in again.
Remember that the old contents of your desktop haven’t vanished. They’re still in the Desktop folder in your /home folder.
3. Scroll Without the Mouse in Firefox and Evolution Mail Windows
Both Firefox and Evolution have a hidden caret browsing feature. This is where a cursor appears in a web page or received email, just like in a word processing document. Just like in a word processor, its position can be controlled using the cursor keys. When the cursor reaches the bottom or top of the screen, the page (or email) scrolls.
Caret browsing was designed as an accessibility feature for those who find reading difficult, but it’s proved popular for every kind of user. This is because it allows people to navigate web pages or emails without taking their hands off the keyboard (there’s no need to reach for the mouse scroll wheel, for example) and also keep track of where they were last reading should they walk away from their computer. In addition to navigation, text can be highlighted in the usual way by holding down Shift and using the cursor keys. It can then be copied in the usual way by pressing Ctrl+c.
To activate caret browsing in either application, just hit F7 while the program is running. The cursor will appear at the top of the web page or email preview window, although it can be repositioned by clicking the mouse anywhere.
4. Quickly Create Links to files, Folders, and/or Applications
There is a curious feature missing from the Ubuntu desktop: quick and easy shortcut creation. For example, suppose you want to create a desktop shortcut to your Documents folder. You can right-click it and select Make Link, but this won’t work with all folders because the new link is created within the parent folder, and you might not have permissions to write there (this can be an issue when creating links to system programs in the /usr/bin folder, for example). You can create a desktop launcher that redirects to the folder or file, but this is annoyingly long-winded and involves working your way through a dialog box.
A solution to this problem is built into GNOME. It’s just hidden. Simply middle-click the folder or file, drag it to where you want the shortcut to be, and then select Link Here from the menu that appears when you release the mouse button. This will create a new link to the folder or file. On most modern mice, the middle mouse button is the scroll wheel, which doubles as a third mouse button.
The type of link created is a symbolic link, which isn’t just a GNOME desktop shortcut. It will also work at the command line too.
To create a symbolic link at the command line, type ln -s, specifying the original file and then the new link name (including paths, if necessary). For example, the following will create a link to the Gedit text editor (which lives in the /usr/bin folder) on the desktop and call it Text Editor; this command assumes you’re currently browsing your /home folder:
ln -s /usr/bin/gedit "Desktop/Text Editor"
After this, the link will act just like the original file—double-clicking it will start Gedit. It’s worth pointing out for the nervously inclined that deleting the shortcut won’t delete the original file.

5. Intelligently Select Only the files You Want
Imagine the following: you’re working on a project and have been saving the files in your Documents folder, which is where all your files tend to end up, regardless of project. This particular project involves pictures (of varying file types), word processing documents, and spreadsheets... You spend a few minutes considering how chaotic it all is, and then your boss asks you to send all the project files to him. However, there are hundreds, and you can’t sort by file extension or alphanumerically, because they’re all different.
Assuming all the files contained the project name, you could use Nautilus’s Select Pattern function, which is found on the Edit menu. For example, assuming the project is called Falken and this word appears somewhere within the project files’ filenames, you could type the following into the Select Pattern dialog box:
*falken*.*
This uses wildcards, in the form of asterisks, to indicate characters within the filename that could equate to anything. So, the files could start with any text, could end with anything, and could have any file extension, but if it contains the word falken somewhere within it, it will be selected, as if you’d just clicked it. Assuming several files match the pattern, they will all be selected, and you can then click and drag them to the email you’re about to send to your boss. Note that the pattern selection tool is case sensitive.
6. Rename Many files at Once (aka Bulk Rename)
Have you ever been out with your digital camera and then returned home to find yourself with lots of files with names like IMG_0159.jpg, IMG_0160.jpg, IMG_0161.jpg, and so on? And have you then gone through one by one renaming them to something relevant? Well, there’s no need to ever do that again because Ubuntu can come to the rescue!
There are a handful of ways of bulk renaming files using the command line, but many are quite involved, and you’ll need to remember a chain of commands. To save the effort, use Synaptic to install purrr (that’s pu, followed by three r’s!). This is a GUI application that allows simple bulk renaming. Once installed, you’ll find the program on the Applications —-> Accessories menu.
1. Start by clicking and dragging the files from a Nautilus window onto the files section of Purrr. If you intend to bulk rename the files with sequentially increasing numbers, it’s important to first sort them into the right order before dragging across——possibly the best way of doing this is to click View —-> View as List in Nautilus and then click the Date Modified heading to sort by the time the files were created (this is ideal for digital photographs). Alternatively, you might click the Name heading if the filenames can be sorted alphanumerically. Then Shift-click to highlight many files at once and drag them into the Purrr window.
2. In the Name template text field, you need to type the basic format of the new filenames. For example, if the pictures were all taken at Disneyland, you might type that. You’ll see the effect on the new filenames as you type, although they won’t actually be renamed until you hit the Rename button.
3. There are a handful of useful special inserts you can make into the filename. Typing [N] causes the original filename to be added to the renamed files, while [C] adds a sequential number count. [E] causes the file extension to appear (necessary if [N] isn’t used).
Here’s an example. The following, when typed into the Name template box, will cause all the files to be named Disneyland, followed by a sequentially increasing number, and then followed by the original file extension:
Disneyland [C].[E]
Try it to see what happens. The [C] (count) operator can be further configured. A single comma inserted after C, followed by a number, sets the start number for the count. For example, [C,400] will start the count at 400. For an example from my test PC, see the screenshot. Two commas causes the count to skip numbers as it counts upward. For example, [C,,4] will name the first file with 1, the second with 5, the third with 9, the fourth with 13, and so on. In other words, +4 each time.
Three commas causes the count to be “padded” with zeros, and the number of zeros is specified by the number that follows. [C,,,3] will cause the count to start at 001, then 002, then 003, and so on. When the count reaches double or triple figures, the padding zeroes will disappear (that is, Disneyland_009.jpg, disneyland_010.jpg...disneyland_099.jpg, disneyland_100.jpg, and so on).
4. Once you’ve typed your selection, hit the Rename button to carry out the renaming.

7. Instantly Create an HTML Slideshow of Photos
Use Synaptic to install igal. Once installed, copy all the pictures you want to make into a slideshow into one folder. Then switch to that folder in a terminal window, and type igal. It’s as simple as that——there’s no need to specify the files. The necessary HTML files for a slideshow will be created automatically, and all you need do is upload all the files to your website. The main file igal creates is index.html, and you might want to rename this to something like slideshow.html to avoid overwriting your website’s index.html file. You should also be aware that igal creates thumbnails of the images as hidden files (files preceded by a period), and these will need to be uploaded to the website too. To view then in a Nautilus file-browsing window, click View —-> Show Hidden files.
There’s no reason why the slideshow will work only online. You could also email the whole folder full of images plus HTML to others as a single compressed file and instruct them to double-click index.html when they’ve decompressed the folder. The slideshow will then open in their browser.
8. Post Blog Entries from your Ubuntu Desktop
Use Synaptic to search for and install gnome-blog. Once installed, right-click a blank spot on the panel, and select Add to panel. Then select Blog Entry Poster from the list.
The program is designed to work with blogs hosted at Blogger.com, Advogato, or LiveJournal. Alternatively, you can configure the software to work with MovableType, Pyblosxon, or WordPress installations on your own web site.
When it runs for the first time, the program will ask you to set up your blog details. You’ll need to set the blog type in the Blog Type drop-down list and then set your user name and password (if you’re attempting to access blog software you’ve manually installed on a website, you’ll also need to provide the URL). Then click the Lookup Blogs button both to confirm the details are correct and to retrieve the list of blogs that you can use the applet to contribute to. Once the lookup has completed, select its entry from the Blog Name drop-down list. Note that you can contribute to only one blog using the applet.
To make a new posting, just click the applet’s button on the panel. Type the title, as prompted, and then the body of the posting into the window. Then click the Post Entry button. Pictures can be dragged and dropped onto the posting window for inclusion too.

9. Quickly Hide/Unhide Windows Using the Keyboard
Ubuntu can “roll up” windows to just their title bars (known as shading), but the function isn’t activated by default. However, the function can be coupled to a keyboard shortcut so that you can quickly roll up a window to see what’s behind it, before unrolling it again (for example, if you’re typing something you’ve seen on a Firefox web page into a terminal window).
To set this up, start Keyboard Shortcuts (System —-> Preferences), and scroll down to the Toggle Shaded State entry in the list. You’ll need to use a keyboard shortcut not already in use and also one that you won’t accidentally press. I find Ctrl+Alt+Space works pretty well, so click in the shortcut column alongside the entry in the list, and then hit the shortcut combination (that is, hit Ctrl+Alt+Space—-don’t type the words!). Then give it a try on the Keyboard Shortcuts window—roll it up, and then roll it down! If you want to get rid of the shortcut, repeat the previous step to create a new shortcut combination for the entry, and hit Backspace (not Delete!).
10. Get a nice trash can on the desktop
By default, Ubuntu keeps the desktop clean. I think that if your desktop isn’t cluttered with icons, then you’re not human (and may possibly be a robot). To add the usual Trash, Computer, Network Servers, and other icons to the desktop, start gconf-editor (hit Alt+F2 and type gconf-editor), and head to the /apps/nautilus/desktop entry in the list on the left of the program window. Then, on the right side, put a check alongside trash_icon_visible, home_icon_visible, and so on. The new desktop icons should appear immediately.
The paperback version of Ubuntu Kung Fu is available from all good bookshops, or you can buy the PDF version for just $22.
Beautifully Minimalist Conky Setup
 Topping off our fascination with Linux desktop monitor Conky this week, here's a remarkable setup on Ubuntu that delivers Gmail counts, Yahoo weather with graphics and system stats, all with an eye for uncluttered text and transparent integration with any wallpaper. Check out a larger look at this Conky setup, and the desktop it came from, below. Want to get started setting up your own ambient monitor? Check out our guide to customizing Conky.
These pictures come from Quick Tweaks' detailed Conky how-to, which explains how to set up Gmail monitoring, Yahoo Weather updates, and statistics from your system temperatures and fans. The author is also rocking Avant Window Navigator, GNOME-DO (running a Launchy-like skin), and an Emerald theme. Check out the post for more details.


Thanks for the link, asge!
How To Build a 3D Lego Halloween Pumpkin

While this Lego Halloween Pumpkin is not as spooky and macabre as the sectioned Lego minifig showing his skeleton and inner guts, it is a complete must in any geekabolous nerdy Halloween decorations. In fact, I would be building a whole bunch of this following these very simple instructions:

Is you are wondering where to get all these bright orange bricks for this 3D Lego Halloween Pumpkin you will need two of these Lego packs. [Lego— Thanks LIndsay Joy]
SoftPerfect Network Scanner Digs Through Networks from a Thumb Drive

Windows only: A good network scanner digs deep into any network it's pointed at and opens it up for you to get into. SoftPerfect Network Scanner does those things, can do them from a thumb drive, and is a good deal less intimidating than some other scanner apps out there. The small program lays out its network findings in an easy-to-grasp manner, and can be expanded to show you more than just names and addresses. Weighing in at less than 1MB, it makes a great addition to any thumb drive, especially for anyone often called upon to figure out what's up with the router. Check out some of SoftPerfect's deeper options and offerings below.
After grabbing and installing the stand-alone executable, you'll see that SoftPerfect can do some pretty basic system-finding and exploration. Head to "Options" and choose "Auto Detect Local IP Range" to save yourself the typing. On most home networks, if you're prompted for an interface choice, pick the one that starts with 192.168. Hit "Start scanning," and you're off.
 If SoftPerfect finds a shared folder, you can right-click it to open Windows' native explorer view or map it to a virtual letter drive. Right-clicking a computer icon offers you wake-on-LAN sleep/wake-up options, along with HTTP, FTP, and Telnet connection. Where are the MAC addresses, though? And how do you know which workgroup a system belongs to? Head into the options (Options menu, choose Program Options) to unleash SoftPerfect's more powerful tools.
 The General tab doesn't offer too much intriguing, unless SoftPerfect is timing out on you regularly. Under Additional, though, you can enable MAC address finding, which you'd need to remotely wake up or put a computer to sleep, or to lock down a network later. The Workstation tab has more useful tools, including look-ups of "LAN group" (i.e. the workgroup setting that's driven many a would-be Window file-sharer nuts) and others.
More powerful than any of those, though, is the Applications tab. Here you can set up quick pipes to unleash your favorite apps on remote systems, whether you're using PuTTY for SSH access, Total Commander to browse files, or just connecting to your streaming Jinzora jukebox with Firefox, while keeping Chrome your default browser (or vice-versa). Simply hit "New" and fill in the apps' details, and right-clicking on a system will let you work your custom-app magic.

SoftPerfect's great for anyone whose home router or cable modem regularly switches up their systems' IP addresses, or for traveling tech types who like to know what's on deck right away. Found a better use for SoftPerfect, or your preferred network scanner? Tell us in the comments.
SoftPerfect Network Scanner is a free download for Windows systems only. Thanks, MyTQuinn!
Thursday, October 23, 2008
AppCompactor Cuts (Some) Portable Apps Down to Size
 Windows only: If you've got an older USB drive that can't quite fit all the great launchers from the PortableApps.com site, AppCompactor rides to your rescue with serious compression tools—in some cases, anyways. The open-source (and, of course, portable) tool offers a range of compression methods, ranging in compatability and effectiveness, that knock down the executables, ZIP files, and other elements that get to work once you point it at your portable app folder. In the case of portable CCleaner, it took more than 30% off the size; with IM client Pidgin's portable, however, it reduced by just 5 KB. Still, for those looking to fit just a bit more onto their thumb drive, AppCompactor is worth a try. AppCompactor is a free download for Windows systems only.
Customize Conky for Ambient Linux Productivity
 Linux often gets criticized by the ease-of-use crowd for making its users occasionally edit a text file to get something working. In the case of the nimble, endlessly extensible desktop monitor Conky, though, a text file is a great thing. You can changed the format, color, font, and output of what Conky shows you any way you want, and using some freely available tools, have Conky monitor your email, Google Calendar, local weather, music, and even keep tabs on your text-based To-Do list. If you were intrigued by how much love Conky gets from our Linux users, read on to learn how to set up your own uber-useful, lightweight embedded monitor.
Basic setup
Most any modern Linux distro should offer Conky in its repositories; if not, you can grab a source package from SourceForge and compile it yourself.
You could launch the default Conky setup at this point if you wanted—simply run conky from a terminal, by pressing Alt and F2, or by setting up a shortcut—but let's get configuring. First up, copy the default Conky config file to our home directory. On Ubuntu systems, at least, the default is stored at /usr/share/doc/conky/examples/conky.conf.gz, so we'll copy the contents of that compressed file into our custom .conkyrc file in our home directory. You can do that graphically with compression tools and drag-and-drop, or run this command in a terminal:
zcat /usr/share/doc/conky/examples/conky.conf.gz > ~/.conkyrc.conkyrc files tell Conky everything you want displayed, and how to display it. Proud users post and trade them all the time, and they're easy to import. So if you see a nice layout and color scheme at the Conky screenshot page, within the seriously gargantuan Ubuntu Forums trading post, or elsewhere, you can simply copy the contents of that file, dump them in .conkyrc, and restart the app to see how it works on your own desktop. If it doesn't look right, or messes with your 3D effects, you can simply run that decompression command above again to restore a working configuration.
Now, onto the fun stuff—tweaking the text. Open the .conkyrc file in your favorite text editor (sudo gedit ~/.conkyrc or sudo kate ~/.conkyrc should do it for GNOME and KDE systems respectively), and take a look around. The file is basically divided into two sections: The top, where universal settings are changed, and everything after the word TEXT, which is what Conky actually shows.
The settings at the top almost all have numbers, text, or "yes/no" statements after them, which you can, of course, change. Here's a few worth looking at:
- update_interval: How many seconds Conky waits before refreshing itself. Even a "1.0" value shouldn't affect performance too much on a modern system, but if you're not looking for real-time system stats, you can scale it back or leave as-is.
- double_buffer: Prevents flickering on systems that have desktops capable of supporting it. If it's not enabled, it most likely should be.
- own_window: If set to "yes," Conky runs like any other desktop app in a window frame. Set to "no" and Conky embeds itself on the desktop (though other settings may affect this).
- maximum_width, default_color, and alignment: Sets up Conky's look and feel. Change
maximum_width, or addminimum_widthif you'd like, to prevent text output from setting Conky's size.default_colorcontrols text that isn't manually switched to another color; using "white" or "lightgrey" works for most desktops. You'll likely findalignmentlisted four times, with "top_right," "bottom_left" and the like after it, and all but one commented out with a "#" at the beginning of their lines. Uncomment one to change where Conky sits itself on your window.If you've found a cool Conky config file that displays email, RSS feeds, and other data, but it just won't work on your system, that's likely because you're lacking a background script the poster has installed. Here's how to put a few of your own in your Conky.
Adding the cool stuff
Conky can launch and grab the output of any command-line app and display it the way you want. In other words, if you run across a Python script or terminal app that does something cool and returns text results, it can fit in Conky.
If you've got a script in mind, head to the lower TEXT section of your
.conkyrcfile. On a new line, type a line like this:${execi 900 super-awesome-command}That tells Conky to run the "super-awesome-command" every 900 seconds (i.e. 15 minutes) and pull the results. Using that type of command in the screenshot above, I'm grabbing my Google Calendar appointments, checking my Gmail, pulling down weather data for Buffalo, NY, and listing what's playing in my Rhythmbox music manager. The scripts come from one super-helpful Ubuntu Forums poster, kaivalagi, who offers both easy-to-install .deb files for Ubuntu users and source packages for anyone else. If your system can run Python scripts (and most can), you can use his tools.
Here's a Google search of all the Conky-ready tools kaivalagi has put together, and here's the ones I'm using in the screenshot. The packages are attached at the bottom of each post; read the instructions for details on configuring the output:
- Weather.com updates (requires signing up for an XML account from Weather.com)
- POP/IMAP mail checker (Gmail users should reference Google's IMAP instructions for help setting up).
- Google Calendar appointments
- Rhythmbox monitor
Want to monitor a text-based to-do file? You'd use the
catcommand with the same Conky syntax. Here's an example Conky section provided by Big Oh Software:ToDo file
${color0}TODO:${color1}
${execi 30 cat /home/username/Desktop/TODO.txt | fold -w40 }If your to-do file or any other section is getting cut off too soon, that's because Conky has an unseen default text limit for any object. You can tweak it by adding a
text_buffer_size 512to the top section of your.conkyrc, changing that number to fit your needs.I'll go ahead and share my .conkyrc file, which uses all of the scripts pasted above. I've stripped my username and password from the Gmail and Google Calendar sections, and the Weather.com widget requires a separate configuration file (installed with the script) that contains your Weather.com sign-up info.
Now, let's see some of your own awesome Conky setups. If you can paste it in the comments without too much warping, go for it; otherwise, consider using a link from an online storage service that offers a free account. Feel free to point us all to other great Conky-friendly scripts and tools as well.
JournalLive Automatically Tracks Your Time

Windows only: See how much time you spend instant messaging friends and crafting PowerPoint presentations with time tracker app JournalLive. JournalLive logs everything you do on a computer, from gaming to email, including who you communicate with and what documents you're working on in applications. It automatically generates all sorts of reports for tracking productivity on the web site, including timesheets—perfect for recording billable hours. The pro edition allows managers to track employees, presumably so hard workers can be recognized and shirkers get sent to human resources for a stern lecture. The personal edition is free, the professional edition costs €10 per user, for Windows only. Thanks, owenconnor666!
Tiny Watcher Detects System Changes, Rolls Back If Necessary
 Windows only: Free application Tiny Watcher monitors your system for changes to your registry, drivers, and first-time programs and provides you with options to undo any unwanted changes. The application's site judiciously provides a list of pros and cons that are spot on. Pros: It's lightweight and only runs when you need it, it detects most important changes that can happen on your system, and it's configurable. Cons: It's not a real-time monitor, so you'll only be alerted of changes after the fact, and it doesn't automatically clean up messes for you—you still have to identify and tell it what you want to reverse. Tiny Watcher is freeware, Windows only. If you want a touch more protection when you're trying out new software, check out how to safely install software in a virtual layer with previously mentioned apps like Altiris SVS or Sandboxie.
Sun PDF Import Adds PDF Editing to OpenOffice.org
 OpenOffice.org only (Windows/Mac/Linux): The Sun PDF Import extension imports and edits PDFs with the free Microsoft Office alternative OO.org. Rather than import the PDFs into the Writer program, the extension works with OO.org's Draw application. Once imported, you can still edit text or other portions of the document. The extension isn't perfect, but it appears to be under active development and could come in really handy under the right circumstances. The Sun PDF Import extension is free, works wherever OpenOffice.org 3.0 does. If you're looking to add more great functionality to OpenOffice.org, check out previously mentioned extensions like OpenOffice.org2GoogleDocs, Writer's Tools, and LanguageTool. Want to learn more about whether OO.org can replace Office, check out our first look at the latest release.
Conky Puts Lightweight Ambient System Stats on Linux Desktops
 Linux only: Conky is a free, open-source system monitor that's been featured in more than one of the Linux desktops we've featured, but pegging it as just a CPU/memory/process watcher is a bit unfair. Conky can keep track of your unread IMAP mail, show what music's playing right now, and pull off more than 250 other data stunts using its built-in variables. It's not a new app—in fact, it's pre-packaged for most Linux distros by now—but we've (surprisingly) never given Conky a featured post before, and it well deserves one. Conky is a free download for Linux systems only; Windows and Mac users can get similar stats with Samurize and GeekTool, respectively. Got a favorite Conky config trick or script to share? Post it in the comments. Screen cap by LH reader Regac
Wednesday, October 22, 2008
Taking NowMessage voicemail for a spin
It's been a while since we've talked about visual voicemail applications for BlackBerry. There seems to be a growing sense, as I'm hearing both from friends and message boards, that carrier voicemail sucks. I have to agree with these sentiments. I hate dialing into my VM and listening to my messages in sequence. It just seems so inefficient. Thanks to these voicemail alternatives, I haven't checked my carrier voicemail in months. Today, we're going to talk about another service, a free one: NowMessage.
The basics of NowMessage
 The entire idea behind NowMessage is to rid yourself of crappy carrier voicemail. The service links into that data, and extracts it in a manner that's easy to digest. In this manner, it is similar to YouMail, though I'm finding NowMessage far easier to handle.
Once you receive a voice message, it processes through NowMessage's system and sends it to your email in the form of a .wav file. If you prefer, you can also receive text message notifications. However, for BlackBerry users, that is rather redundant. I'm guessing you're going to send it to an email that pushes to your phone. Then again, my phone doesn't ring when I get new emails, and it does for text messages. So it can act as an alert.
Getting started
 First thing's first. Head to the NowMessage website (nowmessage.com, linked above) and click on Sign Up. You'll then start the kinda-long registration process. NowMessage will ask for your phone number and corresponding email address, then move onto your name and your preferences. This part of the process is easy, and takes no time at all.
After that, you'll have to go through a number of steps to complete the registration. This includes setting up a new voicemail password, which you will use to sign into your account. This need not be the same as your carrier voicemail password.
Once you enter in all the information, you'll be prompted to dial a number, starting with *, which will program the service. You'll hear a tone, and then the call will hang up. The next step is to dial the number they provide on the screen. This takes you through a further programming process.
A voice menu will guide you through, asking you to record your name as well as your personal greeting. It's not really that intensive, but it does take a few minutes. I guess you'll get those minutes back when you save time checking your voice messages.

That should be it. You'll have to respond to an email asking you to confirm your address, but other than that you're set. You can log into your account at NowMessage.com using your phone number and voicemail password.
Receiving messages
 Once someone leaves you a voicemail, NowMessage gets right to work. It converts the message to a .wav file, and sends it to your email address and sends you a text alert (if applicable).
Really, that's it. You can then download the attachment, which will automatically open and play in your BlackBerry Media Player. It doesn't take too long to download, or at least it didn't for me (Verizon in NYC). While the file is small, the voice quality is surprisingly decent.
Thoughts on NowMessage's service
Generally, I'm pleased with NowMessage, and will probably keep using it for a while to see how well it works in the long-term. Once I was through with the lengthy registration process, it was a breeze. That's part of the appeal: it's totally no-frills. Receive message, download message, play message. Das it.
Of course, one of the drawbacks is that there is no transcription service. For NowMessage's purposes, though, that's fine. Transcriptions, especially quality ones, will end up costing money. NowMessage's appeal is that it's free, though I imagine they could add the transcription as a premium service.
The messages were delivered rather quickly. My call log shows a call coming in at 12:09, and the email was pushed at 12:11. That's a pretty decent turnaround time, especially considering it takes a bit to actually leave the message (so it was probably closer to 12:10 that the caller hung up).
If you're in the market for a free solution to our voicemail needs, and don't want the interface of YouMail, I'd definitely recommend NowMessage. If you end up using it, let me know what you think. jpawlikowski bbgeeks com.
a
Monday, October 20, 2008
Give your gadgets some space
At the heart of this release is a feature we call "canvas view," which gives you the option to maximize your gadgets into full-screen mode. To use the Gmail gadget as an example, previously, you could only get a quick snippet of your Gmail messages on iGoogle. Now you can maximize Gmail to fully read and reply to your messages.
Comics. Games. Feeds. Photos. All of these get better when you give them some space. And to give you fast, one-click access to maximize your gadgets, we've introduced a new left-navigation model. This is a good way to navigate to these new, richer applications, and it makes space for more features you'll see in the coming months.
We invite you to take a tour of all the new features, and hope you'll give us a chance to show you why we're excited about the evolution of iGoogle.
Posted by Jessica Ewing, Group Product Manager, iGoogle
Test-Drive Mobile Firefox Alpha 1 on Your Desktop

All platforms (Mac/Windows/Linux): You caught a glimpse of the new Mobile Firefox alpha running on a Windows Mobile device last week, but today you can check out the alpha from the comfort of your desktop. Codenamed Fennec, the Mobile Firefox alpha 1 build gives you a neat look at what's to come on your smartphone and other handheld devices from Mozilla. As the welcome screen instructs, click and drag right to see tabs, and click and drag left to tinker with the software's controls. Fennec is only alpha, and it does show, but it's a promising look at Firefox's take on mobile browsing.
TaskExplorer Is Attractive, Powerful Task Manager
 Windows only: Free application MKN TaskExplorer is a Windows Task Manager replacement packed with options, system information, and pretty graphs. We've highlighted tons of alternative task managers in the past, but TaskExplorer still manages to stand out with a great, uncluttered interface and easy to read stats. MKN TaskExplorer is freeware, Windows only.
iGoogle Sidebar Collapse Removes the New iGoogle Sidebar
 Firefox with Greasemonkey: The iGoogle Sidebar Collapse Greasemonkey script toggles the visibility of the new iGoogle sidebar with the click of your mouse or with a user-defined keyboard shortcut. We gave you a closer look at the new iGoogle with canvas view yesterday, and today over half of you gave it the thumbs down. You main complaint: The new sidebar eats up a substantial chunk of screen real estate. iGoogle Sidebar Collapse reclaims that stolen space, collapsing and expanding the sidebar at your will. Thanks Nicholas!
BioBeer Fights Cancer and Gets You Drunk, Not Necessarily In That Order
 A team of students from Houston's Rice University are a virtual lock for a Nobel Prize with their latest research. They've bioengineered a beer that has anticancer properties. Each sip of their new brew contains resveratrol, the chemical found in wine and believed to be responsible for reduced cancer rates in lab tests. How long before you can find Resveratrol IPA on store shelves?
The BioBeer project will be entered into the International Genetically Engineered Machine (iGEM) competition to be held next month. Each team uses BioBricks, which are basically DNA toolkits, to create new lifeforms that do interesting things. Although the definition of "interesting" seems rather loose - past entrants included bacteria that smell different depending on whether they're growing or not.
The Rice team, several members of which are not old enough to drink, has genetically engineered a yeast so it will produce resveratrol in a two-step process (one gene produces some stuff, another gene makes the stuff into resveratrol). They haven't actually brewed any yet, and there are a whole lot of steps in between now and the day you can toss back a frosty mug of Cancer Destroyer Porter, but at least the team isn't creating something that could wipe out humanity. According the Rice press release:
Their entry last year, a bacterial virus that fought antibiotic resistance, was well-received but finished out of the prize running.
Now we just need some asthma-fighting pizza, or some anti-diabetes pretzels. Image by: a4gpa.
Better beer: college team creating anticancer brew. [Rice University via EurekAlerts!]
What's new with iGoogle?
Not all of our gadgets have canvas views yet, but here are some of the best:
- News - New gadgets from The New York Times, The Wall Street Journal and The Washington Post give me full-page views of what's new in the world. Nice.
- Games - The Sudoku gadget lets me play thousands of full-page Sudoku puzzles without squinting at 6-point type. The GoComics gadget gives me my fix of Garfield and Doonesbury and lets me choose from all of their other comics. I've also spent many coffee breaks browsing through videos from YouTube and CurrentTV.
- Entertainment - I've configured the TV Guide gadget to my zip code and just used it today to figure out when the newest episode of The Office is playing. Flixster's movies gadget lets me access trailers, ratings, and theater information for any movie. I also use the iLike gadget to browse news, concerts, and free MP3s from my favorite musicians.
- Google stuff - The new Gmail gadget lets me read my full email and perform simple actions like send or reply to emails without leaving iGoogle. Last but not least, a gadget that I authored and use every day is for Google Finance, which provides full-screen finance charts and news of the stocks in my portfolio.
We've also replaced the tabs at the top with a left navigation that allows for access to any gadget with one click. We're very excited about these changes because it makes iGoogle a more useful homepage and a better platform for developers. And this is just the beginning: Expect to see more canvas gadgets created by developers and more new features on iGoogle soon. Not in the U.S.? Don't worry. We'll also be rolling out this updated version in other countries very soon.

Sunday, October 19, 2008
Orphans Remover Finds and Deletes Invalid Shortcuts
 Windows only: Free utility Orphans Remover scans the places on your system where shortcuts to uninstalled programs and deleted files tend to accumulate and gives you a single button to wipe them all away. It's a pretty straight-forward affair—check the locations you want the app to scan, and browse to add any directories not covered in the basic options. A scan of my 80 GB hard drive took less than 15 seconds, and the results seemed valid and safe to delete. As with any find-and-delete tool, you'll want to review the list carefully, but Orphans Remover seems to know what an invalid pointer looks like. Orphans Remover is a free download for Windows systems only.
Friday, October 17, 2008
Virtual CloneDrive Mounts ISOs and Other Disk Images Without Burning a Disc
 Windows only: Free application Virtual CloneDrive mounts any common disk image file type as a virtual drive that you can browse as though it's a normal hard drive without burning a disc. The app supports popular disk image types like ISO, BIN, and CCD, and mounting an image once you've installed CloneDrive is as simple as double-clicking the file. We've covered similar tools in the past, but CloneDrive is the simplest implementation we've seen, and it's made by SlySoft, the folks who develop the popular DVD decryptor, AnyDVD. Virtual CloneDrive is a free download, Windows only.
Foxmarks Updates, Adds Password Syncing
 Firefox only (Windows/Mac/Linux): Popular bookmark-syncing Firefox extension Foxmarks has expanded to support password syncing between your browsers. Many of you have been looking for a good way to sync your passwords since Google discontinued Browser Sync, and now Foxmarks is filling that very need. We told you Foxmarks had been testing password sync a few weeks ago, and now the latest version of the extension bears the fruits of that labor. Once you've updated, syncing your passwords is as simple as ticking the checkbox next to Passwords in the Sync tab of the Foxmarks preferences. You'll need to set a pin to secure your passwords (Foxmarks uses AES 256-bit encryption), but Foxmarks takes care of the rest. It's not as comprehensive as syncing your passwords with Dropbox and KeePass or 1Password since Foxmarks only syncs browser passwords, but if that's all you need, this one's a winner. Thanks Dennis!